Brushless motors
have much more satisfying results as compared to brushed motors. The basic
difference between them is that in a brushless motor, the rotor itself contains
the permanent magnets and the electromagnets move to the stator which is quite
opposite as seen in a brushed motors. It's more precise and can also factor the
speed of the motor into the equation. This makes brushless motors more
efficient. There is no sparking and much less electrical noise. There are no
brushes to wear out. With the electromagnets on the stator, they are very easy
to cool. You can have a lot of electromagnets on the stator for more precise
control. The only disadvantage of a brushless motor is its higher initial cost,
but you can often recover that cost through the greater efficiency over the
life of the motor.
Now when we talk
about controlling these motors I would like to introduce a new term, it is ESC.
These are Electronic Speed Controllers. As their name suggests they control the
speed of brushless DC motors using some electronic protocol. These ESCs need a
command to work further. In this project I’m sending these commands using a
microcontroller, AtMega 16. You might be thinking what these command could be?
Don’t worry, if you have ever dealt with servo motors before, you’ll be able to
control these BLDC motors very easily. Most of the ESCs need a 50Hz frequency
i.e. a 20 ms cycle and the speed depends upon the duty cycle you provide. 1ms
will reduce its speed to minimum or even stop it (it depend upon the ESC model)
while a 2ms pulse will run the motor on its fullest speed. The values between
them give you a variation in speed.

Project Setup

BLDC Motor

Electronic Speed Controller
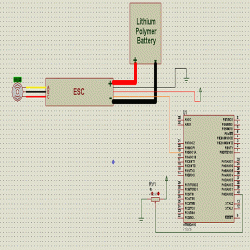
Let me tell you something about the connections
involved here. An ESC needs a power source to work with (this source will also
provide power to the motor). I have used a Lithium Polymer battery (11.1V)
here. Now at the input side, apart from the battery need, it requires a signal
which I have connect to the OC1A pin (PD5). This is the Timer1_A output; I’ll
talk about it in the later part. Next comes the output section with 3 pins A, B
and C. These three pins correspond to the 3 pins of the BLDC motor. The motor I
have used comes with three wires with their colour: yellow, black and red. You
need to connect A to yellow coloured one, B to black coloured one and C to red
coloured one. In case you find your motor running in opposite direction of what
you want, just interchange yellow and red wires.
Timer1 in AtMega 16 is a 16 bit timer i.e. it can
count up to 65535 starting from zero. Now the reason I have used this timer and
why not timer0 or timer2 is that these are 8 bit timers and can count up to
255. When we want a 20 ms cycle we need a value of 20,000 counts (0-19999). As
you can see this value cannot be accommodated in any 8 bit timer therefore I
have switched over 16 bit one. One great thing about 16 bit timers is that you
can set the TOP value you want between 0-65535. Timer 1 is further divided into
two individual 16 bit timers A and B. This project uses the ‘A’ part of timer
1. Also value corresponding to 1ms and 2 ms is 1000 and 2000 respectively.
When you’ll watch the video you’ll notice that I
have controlled the speed using a potentiometer (10K pot). This potentiometer
provides the analog value which is being read by the PORTA_0 pin. This value
then determines the value between 1000 and 2000, as discussed above.
On practically dealing with the motor that I have
used; it was written in its datasheet that it requires a 1ms pulse for a
duration of few seconds or until motor responds you back with a signal (you’ll
understand it better when you’ll watch the video part). This indicates that the
motor is now ready for those commands as talked earlier.
Sign up here with your email
ConversionConversion EmoticonEmoticon